BusyRebar: a LED screen repeater for the BUSY Bar
My BUSY Bar belongs on my desk. That is where I can reach its buttons, use its timers, and read the secondary (black&white) display. But the best position for me to reach is not necessarily the best position for someone else to see its beautiful main (color) screen.
Turning it towards the doorway makes it less convenient to use. Moving it outside the room would defeat the point of having it on my desk. So I want another screen that could show the same status somewhere more visible, near the entrance to my home office room, ideally, outside of it.
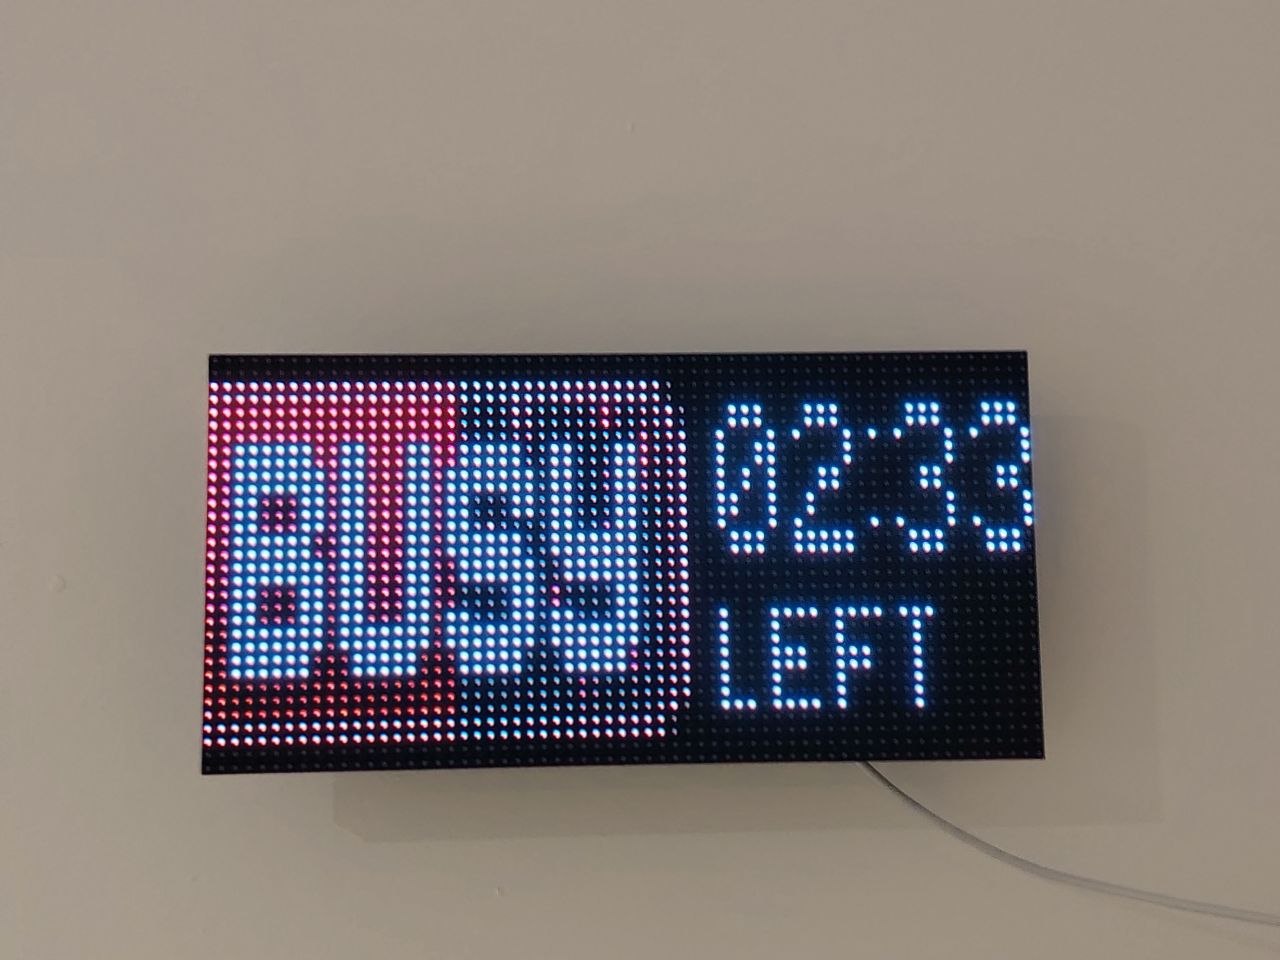
That became BusyRebar: a wireless LED matrix repeater for the BUSY Bar. The name comes from “BUSY Bar repeater”.
The project uses a 64×32 RGB LED panel, a Pimoroni Interstate 75 W, and a Python script on a Linux host. The code and setup reference are in the BusyRebar repository.
How it works
The repeater has two main components: repeater Python script running on a Linux host and LED panel with a controller.
The BUSY Bar needs to be configured for Wi-Fi and HTTP access. The host machine runs repeater.py that fetches a screen frame through busylib (PyPI), transforms the image with Pillow, applies a brightness setting, and sends the resulting pixels over the local network. The LED panel controller (Interstate 75 W) runs main.py, receives those pixels over Wi-Fi, and draws them on the matrix.
| Component | Job |
|---|---|
| BUSY Bar | Supplies the source screen image through its local HTTP API |
| Linux host | Fetches, resizes, and dims each frame |
| Interstate 75 W | Receives a UDP datagram and renders its pixels |
| 64×32 HUB75 matrix | Shows the repeated image |
Keeping image processing on the host makes it easy to experiment with scaling and brightness without changing the receiver. The trade-off is that the host must stay running and awake for the display to update.
Each outgoing frame contains 64 × 32 × 3 = 6,144 bytes: one byte each for red, green, and blue at every pixel. The bridge sends it to the panel’s IP address on UDP port 4048.
The script pauses for 0.25 seconds after each fetch-and-send cycle. That gives it a nominal ceiling of four updates per second; fetching and processing take additional time. It is a periodically refreshed copy of the screen, so there is some delay and fast animations will lose frames.
The awkward part: image resizing from 72 pixels into 64
The BUSY Bar’s main display is 72×16 pixels. Most Led matrix panels have sizes in a power of 2. The panel used here is 64×32: narrower, but twice as tall as BusyBar main (color) screen. There is no way to fit all 72 columns into 64 columns while keeping every pixel unchanged.
The script offers two ways to deal with that, see below.
Optionally crop, then scale
The BUSY Bar’s 72×16 display resolution must be adapted to fit the LED panel’s 64×32 matrix. The script handles this by optionally cropping outer pixels before scaling the image to the target size.
If ENABLE_CROP = True, the script crops columns from each side, removing outer details to keep central elements larger.
The image is then scaled using bilinear or nearest-neighbor interpolation to fit the target dimensions (e.g., 64×32) and centered using vertical and horizontal offsets.
Bill of materials
The core hardware combination I’ve got is a P4 64×32 HUB75 RGB matrix and a Pimoroni Interstate 75 W with RP2350. P4 means a 4 mm pixel pitch; the panel size is 256×128 mm which makes it easy to read from a far.
You will also need:
- BUSY Bar.
- The LED panel’s own default power cable.
- A reliable 5 V power supply.
- A long USB-C cable.
- Any machine (Raspberry Pi?) to run the bridge (the repeater.py script).
- A 2.4 GHz Wi-Fi network.
- Optionally, smoked grey acrylic sheet and a plastic case for mounting hardware.
Assembly
Assembly is very simple: connect Interstate 75 W to the LED panel, including the power connection, then plug in a USB Type-C cable to power it up.
Power demand depends on the panel, brightness, and displayed content. The most common symptoms of power deficit are the panel’s controller restarts and/or failing to connect to your Wi-Fi.
A supply that works for sparse text is not proof that it will handle a full white screen or additional panels. My single 64x32 panel setup works with 5V / 2A power adapter, consuming about 0.25A during usual work (not full brightness).
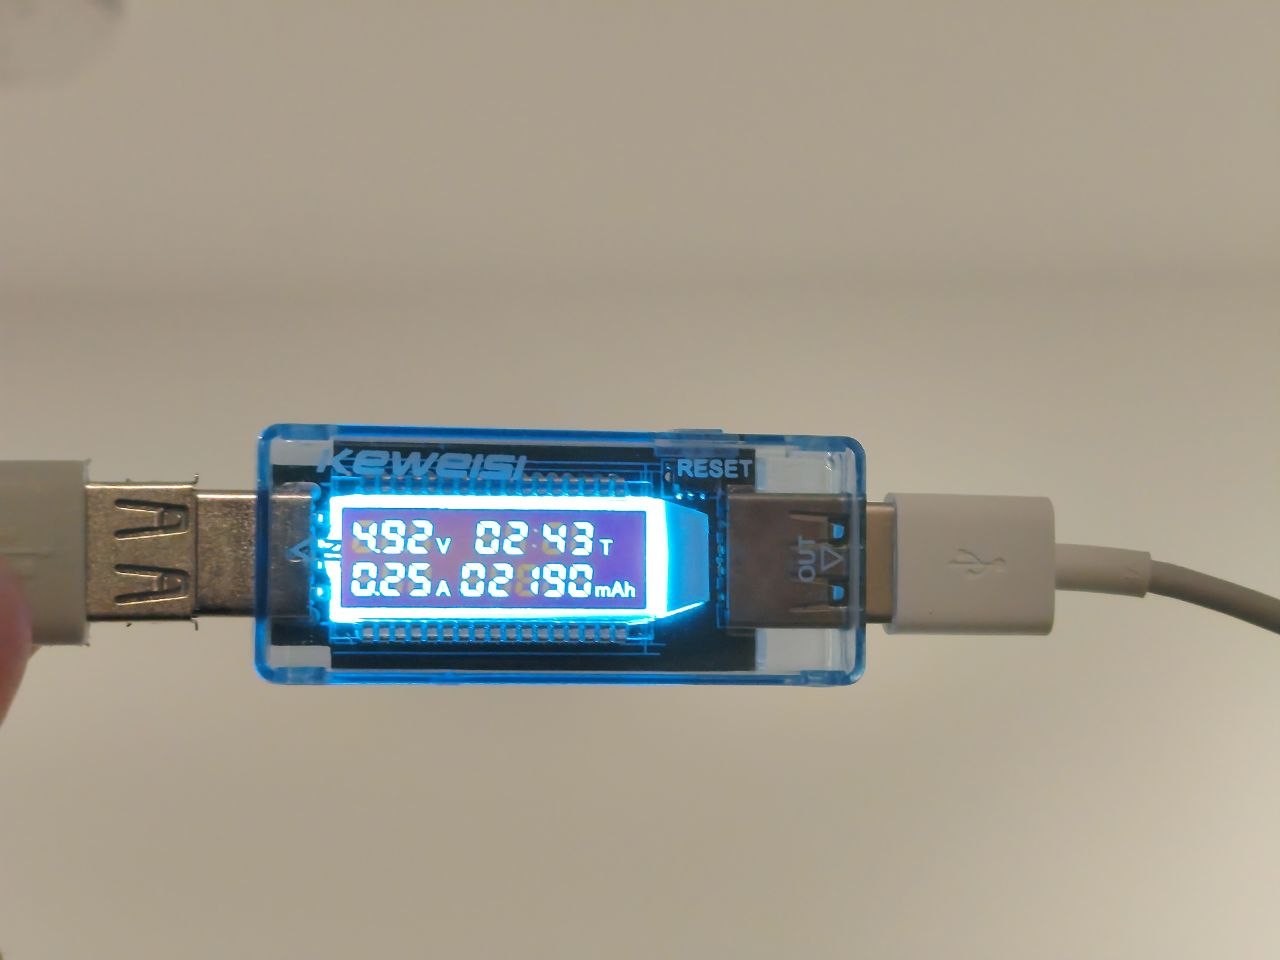
Do the first test on the bench, where the connectors and board are accessible. If the board restarts when the LEDs light up, inspect the power supply, cable, and connections before assuming the problem is Wi-Fi.
Getting the software running
The repository contains two scripts: main.py for the receiver and repeater.py for the host. Use those files for the full code; the steps below focus on what needs configuring.
Enable local access to the BUSY Bar
Enable HTTP API access over Wi-Fi in the BUSY Bar’s local web interface and note its Wi-Fi IP address and API credential. The repository calls this credential an API PIN and stores it in BUSYBAR_TOKEN.
The BUSY Bar HTTP API documentation explains how to enable access through the USB web interface at http://10.0.4.20. Current documentation calls the Wi-Fi credential a password. Use the credential configured on your device.
A DHCP reservation on the router helps keep the BUSY Bar’s address stable.
Set up the receiver
Install Pimoroni’s MicroPython firmware for the Interstate 75 W (RP2350) from its firmware releases. Choose the i75w_rp2350 build for this board. The firmware includes the display support used by the script. Pimoroni provides the installation instructions.
In main.py, configure:
WIFI_SSIDandWIFI_PASSWORD.- The IP address, subnet mask, gateway, and DNS address in
wlan.ifconfig(...). UDP_PORT, if you want to change it from4048.
The supplied receiver uses 192.168.1.231. Treat that as an example: choose an unused address appropriate to your network and keep it from conflicting with addresses your router assigns. A router reservation alone does not change the script’s hardcoded network configuration.
Save main.py to the board and restart it. Three big circles show how far startup has progressed:
| Circle | Meaning |
|---|---|
| Green | The script has started and can draw on the panel |
| Blue | Wi-Fi has connected |
| White | The receiver has received its first 6,144-byte datagram |
The white circle stays visible for 1.5 seconds before the script draws the first frame. These indicators are useful when the panel is running away from a serial console.
The receiver also attempts to set wlan.config(pm=0xa11140) to disable Wi-Fi power saving. The call is wrapped in try/except, so the script continues if the firmware rejects it. Its presence does not guarantee that every connection problem is solved.
Start the bridge
On the Linux host, clone the project and install its dependencies in a virtual environment:
git clone https://github.com/izmalk/busyrebar.git ~/busyrebar
cd ~/busyrebar
python3 -m venv .venv
.venv/bin/python -m pip install Pillow requests busylib
Edit the configuration at the top of repeater.py:
| Setting | Value to use |
|---|---|
BUSYBAR_IP | Your BUSY Bar’s local IP address |
BUSYBAR_TOKEN | Its Wi-Fi HTTP API credential |
PANEL_IP | The receiver address configured in main.py |
PANEL_PORT | The receiver’s UDP port, normally 4048 |
Run the bridge in a terminal first:
.venv/bin/python repeater.py
Watch for errors in the terminal and the white dot on the panel. Then change the BUSY Bar screen or start a timer to check that the image updates.
Check the brightness schedule
The bridge adjusts RGB values using the Linux host’s local time:
| Time | Brightness multiplier |
|---|---|
| 00:00–06:59 | 0.0 — black frames |
| 07:00–07:59 | 0.4 |
| 08:00–20:59 | 0.25 |
| 21:00–23:59 | 0.4 |
These are software multipliers, not calibrated measurements of light output. Adjust them in get_scheduled_brightness() for the panel’s position and any acrylic cover. If you test overnight, the black image may simply be the schedule working as written.
Running it in the background
Once the manual test works, a systemd user service can keep the bridge running on a Linux host that uses systemd. This service definition is an addition to the setup; it is not included in the repository.
Create ~/.config/systemd/user/busyrebar.service with:
[Unit]
Description=BusyRebar LED panel bridge

[Service]
Type=simple
WorkingDirectory=%h/busyrebar
ExecStart=%h/busyrebar/.venv/bin/python -u %h/busyrebar/repeater.py
Restart=always
RestartSec=5

[Install]
WantedBy=default.target
Stop the manually running bridge with Ctrl+C, then enable the service:
systemctl --user daemon-reload
systemctl --user enable --now busyrebar.service
To run the user service from boot and keep it running after logout, enable user lingering:
sudo loginctl enable-linger "$USER"
Inspect the logs or restart after changing the configuration with:
journalctl --user -u busyrebar.service -f
systemctl --user restart busyrebar.service
The bridge catches fetch-and-send errors and retries on subsequent iterations. The service does not make the host stay awake: if it suspends, the display stops receiving updates.
Finishing the panel
Smoked grey acrylic is an option for making the bare LED panel less conspicuous. It can hide the unlit LED packages and improve the apparent contrast, while also reducing the light reaching the viewer. Try a sample in front of the running display before choosing the tint or fixing it in place.
What this version does, and what it still needs
BusyRebar keeps the image processing in one Python file and the receiver small enough to follow. That makes it straightforward to change the crop, move the image, or adjust brightness.
There are also limits to the current implementation. If frames stop arriving, the panel keeps displaying the last image. There is no stale-frame timeout or explicit Wi-Fi reconnection loop. The overnight blanking is part of the normal fetch-and-send cycle, so a failed fetch can also prevent a new black frame from being sent.
Those are useful improvements for a future version: show a clear disconnected state, reconnect automatically, and make blanking independent of a successful screen fetch. The receiver also accepts incoming frame-sized datagrams without checking who sent them, so this version is intended for a trusted local network.
For now, the idea remains simple: leave the BUSY Bar where its controls are useful, and put a copy of its screen where other people can see it. The resizing is imperfect and the extra host is a dependency, but the two-script design makes both the behaviour and the compromises easy to inspect.
The code is available in the BusyRebar repository.
If you give BusyRebar a try, any feedback and feature requests are always welcome!